Every week, we pick a real-life project to build your portfolio and get ready for a job. All projects are built with ChatGPT as co-pilot!
Start the ChallengeA tech-culture podcast where you learn to fight the enemies that blocks your way to become a successful professional in tech.
Listen the podcastUnderstanding JWT and how to implement a simple JWT with Flask
📹 Here is a video explaining the JWT authentication implementation using React.js, Context API and Python Flask.
Almost every API needs an authentication layer, and there are many ways to tackle that problem. Today we are going to be implementing JWT token into our Flask API.
How API Authentication works
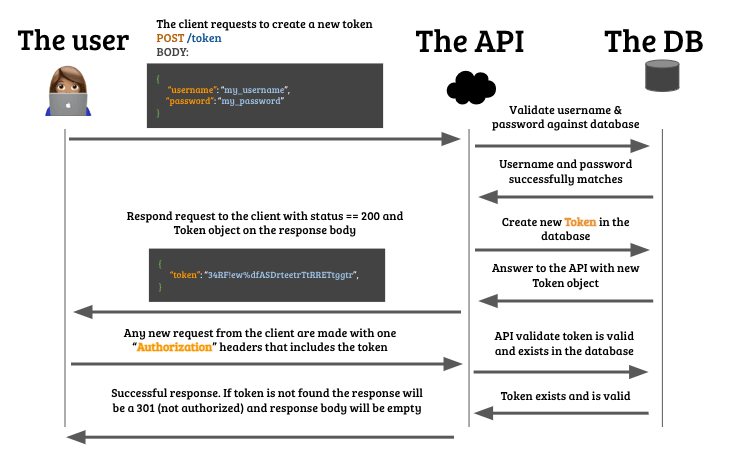
You can divide a standard authentication process into 5 main steps:
- The user writes their username and password on your website.
- The username and password get sent to the backend API.
- The API looks for any record on the
Usertable that matches both parameters at the same time (username and password). - If a user is found, it generates a
tokenfor that user and respondsstatus_code=200back to the front end. - The front-end will use that
tokenfrom now on to make any future request.
☝️ If you don't know what a token is, I would recommend this reading.
What is JWT?
There are many ways to create tokens: Basic, Bearer, JWT, etc. All of them are different in nature but all of them result in the same output: A hash (a big alphanumeric token).
| Type of token | How it looks |
|---|---|
| Basic Token | ecff2099b95ed507a27a4717ec78965d529cc346 |
| Bearer Token | YWxlc2FuY2hlenI6NzE0YmZhNDNlN2MzMTJiZTk5OWQwYWZlYTg5MTQ4ZTc= |
| JWT Token | eyJhbGciOiJIUzI1NiIsInR5c.eyJzdWIiOFt2MjM5MDIyfQ.SflKxwRJSMeKKF2QT4fwpM |
☝️ As you can see, JWT Tokens are bigger than the other two types of tokens.
JSON Web Token, or JWT is an open standard to create tokens
This standard has become quite popular since it's very effective for Web Apps like Google APIs, where, after user authentication you make API requests.
JSON Web Token is a type of token that includes a structure that can be decrypted by the server and allows you to authenticate the identity of the user of that application.
Why use JWT Token?
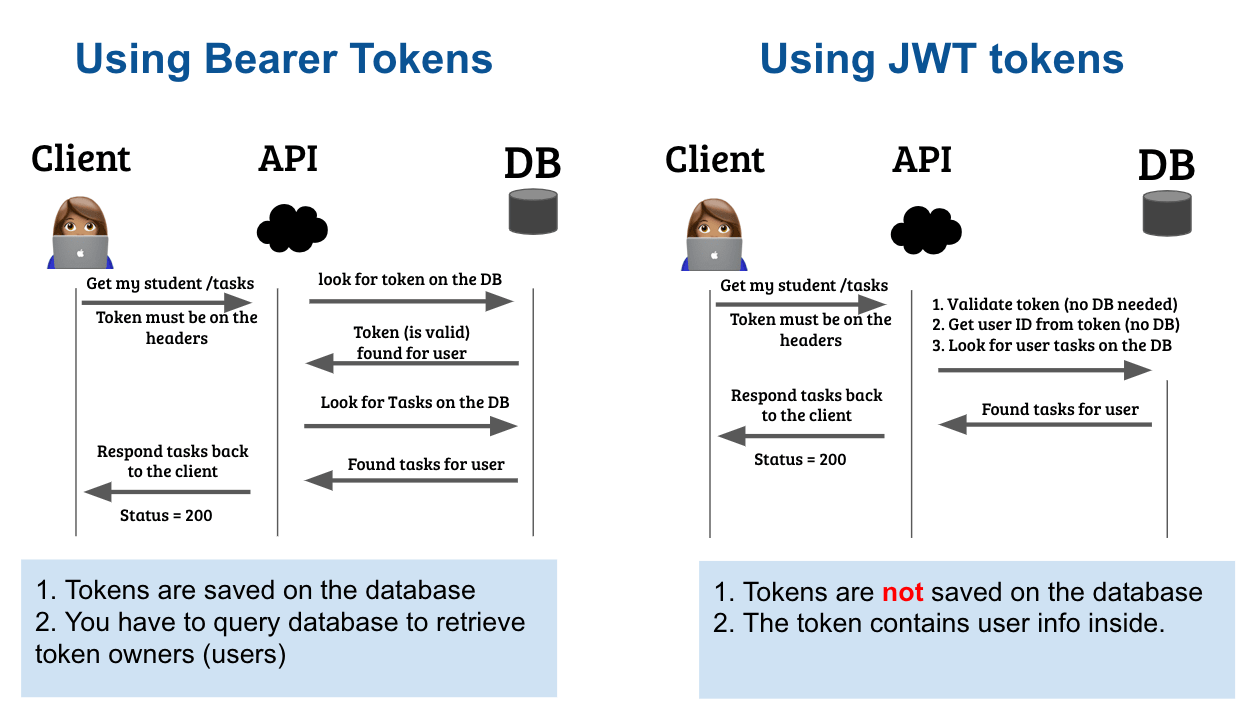
In a nutshell: JWT is an amazing alternative because Basic Token is too simple and easy to hack, and Bearer Token is harder to maintain because you have to store each token on the database.
With JWT Tokens you don't need a database, the token itself contains all the information needed.
Structure of the JWT Token

You may notice that the string is divided into three sections, separated by a dot . - each section has it meaning:
| Section name | |
|---|---|
| HEADER | The first part stores the type of token and the encryption algorithm |
| PAYLOAD | The second part has the data that identifies the user: it can be their ID, username, etc. |
| SIGNATURE | A digital signature, which is generated with the previous two sections, which allows you to verify if the content has been modified. |
Implementing JWT in your project API
We strongly recommend using JWT Extended library to implement JWT authentication in your Python Flask API. The process can be divided into the following steps:
1) Include the JWT library in your Flask App setup
1from flask_jwt_extended import JWTManager
2
3# You must already have this line in your project, you don't have to add it again
4app = Flask(__name__)
5
6# Setup the Flask-JWT-Extended extension
7app.config["JWT_SECRET_KEY"] = "super-secret"  # Change this "super secret" to something else!
8jwt = JWTManager(app)
2) Create one endpoint for generating new tokens
The endpoint should be a POST because you are creating tokens (POST is for creation).
1POST /token
2Content-type: application/json
3Body:
4{
5     "username": "alesanchezr",
6     "password": "12341234"
7}
This is how the endpoint could look like in Python:
1from flask_jwt_extended import create_access_token
2
3# Create a route to authenticate your users and return JWT Token
4# The create_access_token() function is used to actually generate the JWT
5@app.route("/token", methods=["POST"])
6def create_token():
7    username = request.json.get("username", None)
8    password = request.json.get("password", None)
9
10    # Query your database for username and password
11    user = User.query.filter_by(username=username, password=password).first()
12
13    if user is None:
14        # The user was not found on the database
15        return jsonify({"msg": "Bad username or password"}), 401
16
17    # Create a new token with the user id inside
18    access_token = create_access_token(identity=user.id)
19    return jsonify({ "token": access_token, "user_id": user.id })
3) Use the @jwt_required() decorator on private routes
Now... any endpoint that requires authorization (private endpoints) should use the @jwt_required() decorator.
You will be able to retrieve the authenticated user's information (if valid) using the get_jwt_identity function.
1from flask_jwt_extended import jwt_required, get_jwt_identity
2
3# Protect a route with jwt_required, which will kick out requests without a valid JWT
4@app.route("/protected", methods=["GET"])
5@jwt_required()
6def protected():
7    # Access the identity of the current user with get_jwt_identity
8    current_user_id = get_jwt_identity()
9    user = User.query.get(current_user_id)
10
11    return jsonify({"id": user.id, "username": user.username }), 200
Implementing JWT in your project's front-end
On the front-end side, we need two main steps: Creating a new token (a.k.a: login) and appending the token to the headers when fetching any other private endpoints.
Create new token:
Based on the endpoints we built earlier we have to POST /token with the username and password information in the request body.
1const login = async (username, password) => {
2     const resp = await fetch(`https://your_api.com/token`, {
3          method: "POST",
4          headers: { "Content-Type": "application/json" },
5          body: JSON.stringify({ username, password })
6     })
7
8     if(!resp.ok) throw Error("There was a problem in the login request")
9
10     if(resp.status === 401){
11          throw("Invalid credentials")
12     }
13     else if(resp.status === 400){
14          throw ("Invalid email or password format")
15     }
16     const data = await resp.json()
17     // Save your token in the localStorage
18     // Also you should set your user into the store using the setItem function
19     localStorage.setItem("jwt-token", data.token);
20
21     return data
22}
Fetch any private information
Let's suppose I am using the front-end application and I just logged in, but now I want to fetch some private or protected endpoint:
1// Assuming "/protected" is a private endpoint
2const getMyTasks = async () => {
3     // Retrieve token from localStorage
4     const token = localStorage.getItem('jwt-token');
5
6     const resp = await fetch(`https://your_api.com/protected`, {
7        method: 'GET',
8        headers: {
9          "Content-Type": "application/json",
10          'Authorization': 'Bearer ' + token // ⬅⬅⬅ authorization token
11        }
12     });
13
14     if(!resp.ok) {
15          throw Error("There was a problem in the login request")
16     } else if(resp.status === 403) {
17          throw Error("Missing or invalid token");
18     } else {
19         throw Error("Unknown error");
20     }
21
22     const data = await resp.json();
23     console.log("This is the data you requested", data);
24     return data
25}
That is it! As you can see, it's very simple to integrate JWT into your application using Flask/Python, just three steps on the backend and two steps on the front-ent. For any questions, you can contact me on Twitter @alesanchezr or use the #public-support channel on 4Geeks Academy's Slack community.